How to Combine Excel Files into One Workbook (2025 Update)
In this article, we will show you how to combine Excel files into one workbook in Excel. Simply follow the steps below.
Combine Excel Files into One Workbook
Follow the steps below on how to combine Excel files into one workbook.
Method 1: Using Manual Copy and Paste Method
Below are the steps on how to combine Excel Files into one workbook using manual COPY and PASTE method.
1. Create a New Workbook in Excel
Create a new workbook by selecting “File” in the top menu, then choosing “New” from the dropdown. This will be the workbook where you will combine all your Excel files. Make sure to save this new workbook with an appropriate name so you can easily identify it later.

2. Open the First Excel File to Combine
Open the first Excel file you want to combine. Navigate to the file location on your computer and double-click the file, or open it through Excel by selecting “File” > “Open” and then locating the file.

3. Copy All Data from the First Excel File
Select all the data in the first Excel file. Click the top-left corner of the sheet (the area between row numbers and column letters) to select all cells, or press “Ctrl + A” on your keyboard. Once all data is selected, press “Ctrl + C” to copy it.
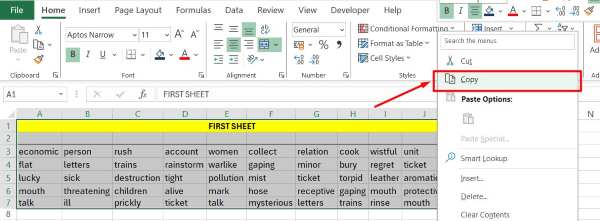
4. Paste the Data into the New Workbook’s First Sheet
Switch back to your new workbook. Click on the first sheet tab, usually named “Sheet1”. Click on the cell A1 to ensure you start pasting at the top-left corner. Press “Ctrl + V” to paste the copied data into this sheet.

5. Open the Next Excel File to Combine
Open the next Excel file you want to combine. Use the same method as before: either double-click the file from its location or use Excel’s “File” > “Open” function to locate and open it.

6. Add a New Sheet in the New Workbook for Each File
In your new workbook, add a new sheet for each additional Excel file. Click the “+” icon at the bottom of the workbook, next to the existing sheet tabs. This will create a new, blank sheet.

7. Paste the Data into the New Sheet
Click on the tab of the new sheet you just created. Click on cell A1 to start pasting at the top-left corner. Press “Ctrl + V” to paste the data copied from the second file into this new sheet.
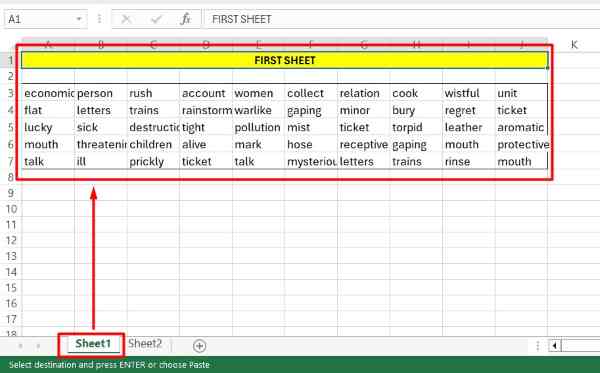
8. Review the Combined Workbook for Accuracy
Review the combined workbook to ensure all data has been correctly copied and pasted. Check each sheet to confirm that the data from each original file is present and correctly placed. Make any necessary adjustments to ensure data accuracy and organization.
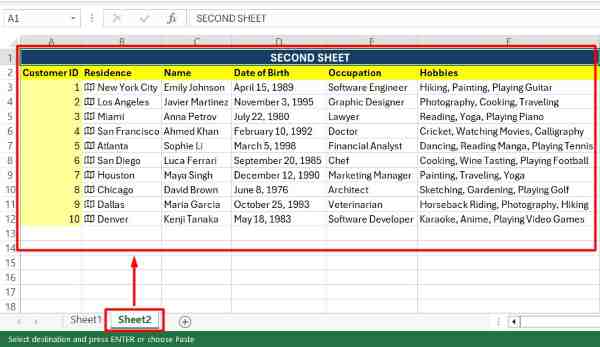
Method 2: Using the “Move or Copy” Sheet Feature
Below are the steps on how to combine Excel Files into one workbook using the “Move or Copy” Sheet Feature.
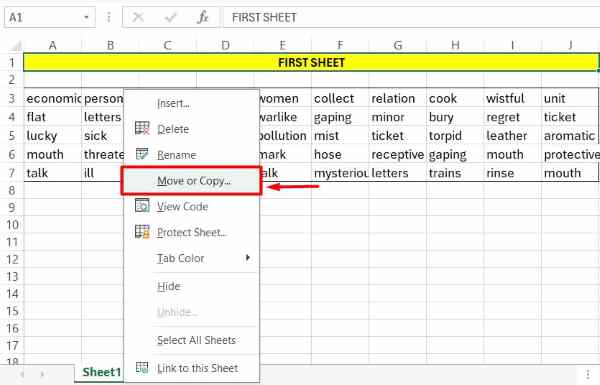
1. Right-Click the Sheet Tab in the First File
In the first file, right-click the sheet tab you want to move or copy. Select “Move or Copy” from the context menu.
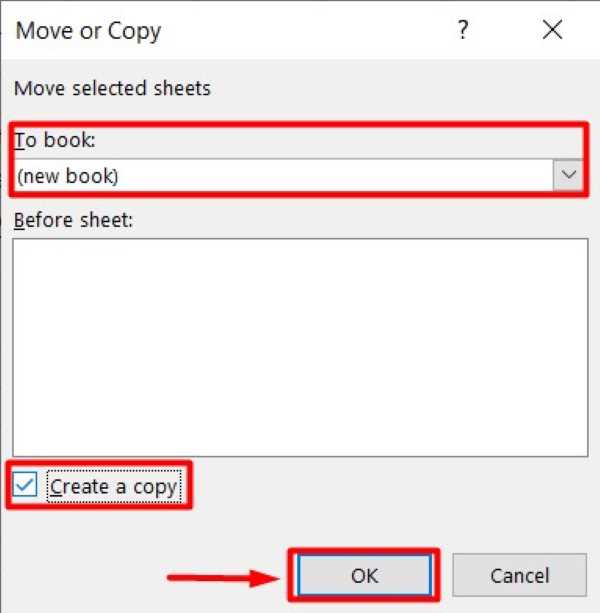
2. Select the Destination Workbook
In the Move or Copy dialog box, select the workbook where you want to combine the sheets from the To book dropdown. Choose “(new book)” if you want to create a new workbook. Check Create a copy if you want to keep the original sheet in its source workbook. Then, click OK. Repeat the process for each sheet you want to combine.
3. Save the Combined Workbook
Once all sheets are combined, save the new workbook by clicking “File” and then “Save As”. Choose a location, enter a name, and click “Save”.

Method 3: Using the Power Query Tool
Follow the steps below on how to combine Excel Files into one workbook using the Power Query Tool.
1. Go to the Data Tab
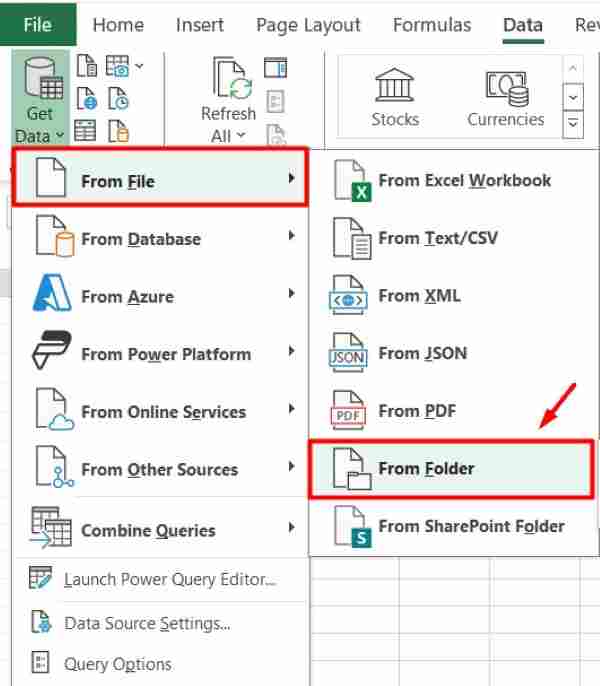
In the new workbook, go to the “Data” tab in the ribbon. Click “Get Data” from the “Get & Transform Data” group.

From the dropdown menu, select “From File” and then choose “From Folder”. This will allow you to import data from multiple files located in a specific folder.
2. Select the Folder Containing Excel Files
Browse to the folder that contains all the Excel files you want to combine. Select the folder and click “Open”. This action will display the list of files in the folder, and you can preview their content in the next steps.

3. Combine and Load Data
In the “Folder” dialog box, click “Combine & Load”. This will open the Power Query Editor, where you will see a preview of the data from all the files in the selected folder. Power Query will automatically detect and combine the data from these files.

4. Transform Data as Needed
In the Power Query Editor, you have the option to transform the data if needed. You can remove unnecessary columns, filter rows, or change data types to fit your requirements. Once you have made the necessary transformations, click “Close & Load” to load the combined data into your workbook.

5. Save the Combined Workbook
Once the data is loaded into your workbook, save the combined workbook. Click “File” and then “Save As”. Choose a location on your computer, enter a name for your workbook, and click “Save”. This will ensure all the combined data is saved in one place for easy access and analysis.

We hope that you now have a better understanding of how to combine Excel files in one workbook in Excel. If you enjoy this article, you might also like our article on how to download a graph from Excel or our article on how to separate Excel sheets into different files.

